一、安装Gitlab
1.安装并配置必要的依赖关系
Ubuntu系统
1 | sudo apt-get update |
- 然后,安装Postfix发送通知邮件。如果您想使用其他解决方案发送电子邮件,跳过此步骤并在安装GitLab后配置外部SMTP服务器。
ps:
配置外部SMTP服务器: https://docs.gitlab.com/omnibus/settings/smtp.html
1 | sudo apt-get install -y postfix |
在Postfix安装期间,可能会出现一个配置屏幕。选择
Internet Site并按回车。使用您的服务器的外部DNS作为’邮件名’并按回车。如果出现其他屏幕,请继续按回车键以接受默认值。添加GitLab软件包存储库并安装软件包
ps:
gitlab-ce 是社区版,免费的
gitlab-ee 是企业版,收费的
1 | gitlab-ee: |
接下来,安装GitLab软件包。将
http:// gitlab.example.com更改为您想要访问您的GitLab实例的URL。安装将自动在该URL处配置并启动GitLab。安装后HTTPS需要额外的配置。ps:
额外的配置: https://docs.gitlab.com/omnibus/settings/nginx.html#enable-httpsEXTERNAL_URL为要配置的URL
1 | sudo EXTERNAL_URL="http://gitlab.example.com" apt-get install gitlab-ce |
- 或者使用清华大学软件镜像站提供的软件源来安装
gitlab-ce
https://mirror.tuna.tsinghua.edu.cn/help/gitlab-ce/
CentOS系统
- 安装镜像源
在/etc/yum.repos.d目录下,新建gitlab-ce.repo文件,内容为:
1 | [gitlab-ce] |
- 然后执行
makecache,目的是将服务器上的软件包信息在本地缓存,以提高搜索安装软件的速度.
1 | sudo yum makecache |
- 安装最新的
直接使用yum install命令
1 | yum install gitlab-ce |
- 安装指定版本的
需要先下载可以去清华镜像站查找
https://mirrors.tuna.tsinghua.edu.cn/gitlab-ce/yum/
注意: 注意区分是el6和el7(CentOS 6.x和CentOS 7.x)
以gitlab-ce-11.0.0-ce.0.el6为例1
curl -o gitlab-ce-11.0.0.rpm https://mirrors.tuna.tsinghua.edu.cn/gitlab-ce/yum/el6/gitlab-ce-11.0.0-ce.0.el6.x86_64.rpm
然后使用rpm命令安装
1 | rpm -ivh gitlab-ce-11.0.0.rpm |
ps: 拓展 rpm 命令
1 | // 简单安装 rpm 包 |
1 | // 安装 rpm 包并在安装过程中显示正在安装的文件信息 |
1 | // 安装 rpm 包并在安装过程中显示正在安装的文件信息及安装进度.(推荐使用) |
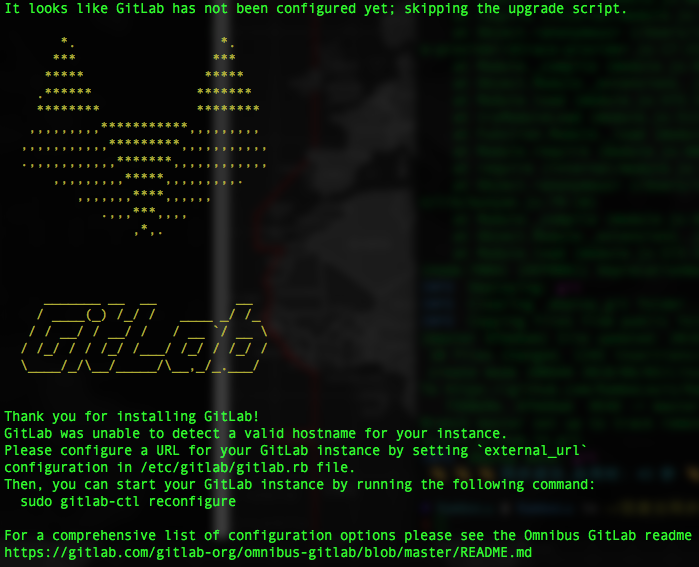
2.安装成功
ps: 这里提示 在/etc/gitlab/gitlab.rb文件中,设置“external_url”为GitLab配置的URL, 所以接下来需要配置gitlab
1 | Please configure a URL for your GitLab instance by setting `external_url` |
3.配置gitlab
- 在
/etc/gitlab/gitlab.rb中设置external_url
ps: 如果在上一步安装 gitlab-ce 的时候配置了指定的 EXTERNAL_URL , 此步可以忽略
配置选项: https://docs.gitlab.com/omnibus/settings/configuration.html#configuring-the-external-url-for-gitlab
1 | 修改: |
- 重新配置Gitlab以使更改生效
1 | sudo gitlab-ctl reconfigure |
- 重新启动服务
1 | sudo gitlab-ctl restart |
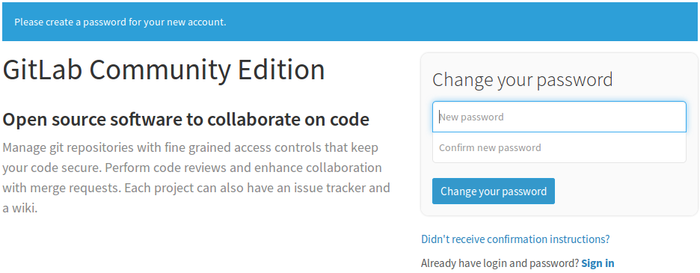
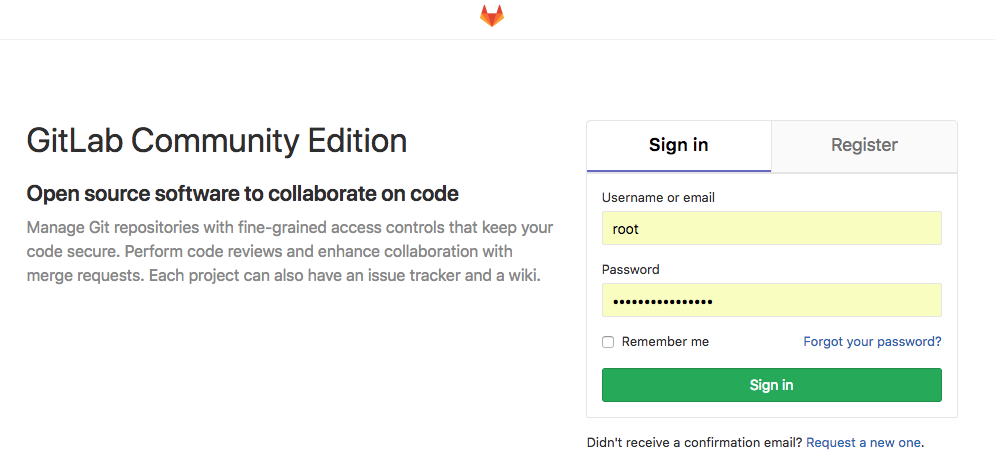
4.登录gitlab
首次登录会让设置密码
ps: 用户名为
root
二、卸载Gitlab
- 停止gitlab
1 | sudo gitlab-ctl stop |
- 查看进程
1 | ps -e | grep gitlab |
- 删除所有包含gitlab的文件及目录
1 | find / -name gitlab | xargs rm -rf |
- 卸载
1 | sudo apt-get remove gitlab-ce |
- 检查还有没有卸载的gitlab相关软件
1 | dpkg --get-selections | grep gitlab |
$ dpkg –get-selections|grep gitlab
gitlab-ee deinstall
再执行
1 | sudo apt-get --purge remove gitlab-ee |
三、汉化Gitlab
- 使用
xhang提供的汉化
https://gitlab.com/xhang/gitlab
1. 查看gitlab版本
1 | cat /opt/gitlab/embedded/service/gitlab-rails/VERSION |

2.下载汉化包
- wget方式(指定版本)
1 | wget https://gitlab.com/xhang/gitlab/-/archive/10-8-stable-zh/gitlab-10-8-stable-zh.tar.bz2 |
- git clone方式(最新版本)
1 | git clone https://gitlab.com/xhang/gitlab.git |
3.解压并查看
ps:
如果使用git clone方式,则无需再解压
1 | tar xf gitlab-10-8-stable-zh.tar.bz2 |
- 查看版本号
1 | cat gitlab-10-8-stable-zh/VERSION |
4.备份gitlab
1 | cp -r /opt/gitlab/embedded/service/gitlab-rails{,.ori} |
- 覆盖
1 | sudo cp -rf gitlab-10-8-stable-zh/* /opt/gitlab/embedded/service/gitlab-rails/ |

5.重起配置及重启gitlab
1 | sudo gitlab-ctl reconfigure |
四、配置Gitlab
- 查看gitlab配置
1 | sudo vim /etc/gitlab/gitlab.rb |
gitlab 备份
1 | gitlab-rake gitlab:backup:create |
ps: 路径在/var/opt/gitlab/backups目录下
1 | gitlab_rails['backup_path'] = "/var/opt/gitlab/backups" |
执行后会生成一个[编码]_[年月日]_[版本号]_gitlab_backup.tar格式的备份文件,例如1551348332_2018_07_20_11.0.0_gitlab_backup.tar
修改备份路径, 进入
/gitlab.rb来修改通过/etc/gitlab/gitlab.rb配置文件来修改默认存放备份文件的目录
1 | gitlab_rails['backup_path'] = "/xxxx/gitlab_backup" |
修改后再重新配置gitlab应用程序
1 | gitlab-ctl reconfigure |
gitlab修改带nginx
- 关闭自带nginx,进入
/etc/gitlab/gitlab.rb查找
1 | nginx['enable'] = false |
修改gitlab的nginx的配置文件
gitlab的nginx是默认80端口,可以进去
/gitlab-http.conf配置文件修改端口号,然后再重启
1 | // nginx配置文件,包含gitlab-http.conf文件 |
- gitlab重启
1 | gitlab-ctl restart |
gitlab迁移
将原服务器上的备份文件发送至新服务器的相应目录下
scp1
scp /var/opt/gitlab/backups/1551348332_2018_07_20_11.0.0_gitlab_backup.tar root@192.168.1.1:/var/opt/gitlab/backups/
gitlab恢复
- 将新服务器的gitlab服务停止
1 | // 停止相关数据连接服务 |
- 修改文件权限为
777,不然会提示权限不足
1 | chmod 777 /var/opt/gitlab/backups/1551348332_2018_07_20_11.0.0_gitlab_backup.tar |
- 使用
gitlab-rake gitlab:backup:restore恢复,注意:_gitlab_backup.tar不用加,会默认加上.
1 | gitlab-rake gitlab:backup:restore BACKUP=1551348332_2018_07_20_11.0.0 |
会提示yes/no,输入yes
- 重启gitlab
1 | gitlab-ctl start |
迁移成功
五、修改Gitlab的Root密码
- 进入 gitlab 生产控制台
1 | sudo gitlab-rails console production |
- 进入加载生产环境 (Rails 5.0.7.1)
1 | irb(main):001:0> user = User.where(id: 1).first |
1 | irb(main):005:0> user.password = 'aaaaaaaa111111111' |
1 | irb(main):006:0> user.password_confirmation = 'aaaaaaaa111111111' |
1 | irb(main):007:0> user.save! |
1 | irb(main):008:0> quit |